Use this option to enable multi-currency transactions and set other details such as the default withholding tax percentage and payment methods.
Refer to "Selecting a Company to Edit".
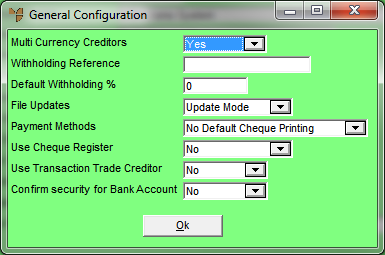
Micronet displays the MCL General Configuration screen.
|
|
Field |
Value |
|
|
Multi Currency Creditors |
Select Yes if you want to enable multi-currency creditors in the Micronet Creditors Ledger. This allows you to use the Import Costing module in MDS to create purchase orders in a foreign currency and, when receiving those goods, to record all costs related to a shipment and calculate the cost of the stock received. When you select Yes in this field, Micronet activates the Rise and Fall account in the Creditors GL interface. |
|
|

|
Technical Tip To use multi currency creditors, you must setup an Exchange Rate master file (refer to "File - Exchange Rates"). |
|
|
Withholding Reference |
Enter your company's withholding tax reference number under the Prescribed Payments System (PPS). If a number is entered in this field, Micronet deducts the Default Withholding % entered in the next field from creditors' invoices as they are entered. |
|
|
Default Withholding % |
Enter the current default GST withholding amount as a percentage, e.g. 48.5 for 48.5%. |
|
|
File Updates |
Select the default mode in which your MCL master file screens should be displayed. The options are:
|
|
|
Payment Methods |
Select your default creditor payment method. The options are:
|
|
|
Use Cheque Register |
Select Yes if you want Micronet to keep a register of last used cheque numbers, or select No if you don’t. |
|
|
Use Transaction Trade Creditor |
2.8 Feature Select Yes if, when processing a payment against a goods receipt or a journal entry or credit against a payment, users must always post against the Trade Creditors account used in the original transaction. Selecting No allows users to select and post against a different Trade Creditors account. |
|
|
Confirm Security for Bank Account |
2.8 Feature Select Yes if you want all changes to bank account details to be authorised by two users to help prevent staff from fraudulently transferring money to unauthorised bank accounts. If you leave this field as No, a single user can change bank account details. If you select Yes in this field, the Bank tab is no longer displayed for any users in the Supplier master file (refer to "File - Supplier - Bank"). In the Creditor master file, the Bank tab is greyed for all users except those who have security to authorise changes to bank details (refer to "File - Creditor - Bank"). When a user with the appropriate security accesses the Bank tab in the Creditor master file and changes the Account Number, Account Name, Bank Name, Bank Branch or Bank BSB, Micronet will display the user login screen twice. Two separate users with sufficient security must enter their details before the change will be saved. |
|
|

|
Reference The security to authorise changes to bank details is set in the Allow editing supplier bank details field on the User File Update screen – Main tab in an employee's userID (refer to "Maintenance - Edit UserIDs - 1. Main"). |
Micronet redisplays the Change Existing Company screen.